Create a Spacious Lofted Shed with These Easy-to-Follow Plans

Build Your Dream: A Spacious Lofted Shed â€" Easy DIY Plans!
Hey there, fellow DIY enthusiasts! Are you dreaming of a bigger, better shed? One with enough room for all your tools, gardening supplies, and maybe even a cozy little workshop? Well, you've come to the right place! This guide will walk you through building a spacious lofted shed, complete with a usable upstairs area. Don't worry, it's easier than you think! We'll break it down step-by-step, using simple language and practical tips. Let's get started!Planning Your Lofted Shed: The Foundation of Success
Before we even think about hammering a nail, let’s get organized. Planning is key to any successful project, especially one as involved as a lofted shed.Choosing the Right Location
First things first: where will your magnificent shed reside? Consider these factors:
- Accessibility: Easy access for your vehicle is a must, especially if you'll be moving heavy equipment in and out.
- Sunlight: Think about how much natural light you want. A sunny spot is great for a workshop, but too much sun might be bad for certain stored items.
- Drainage: Ensure the ground is well-drained to prevent water damage. A slight slope away from the shed is ideal.
- Local regulations: Check with your local council or homeowner's association about building permits, size restrictions, and setback requirements.
Dimensions and Design
Now for the fun part: deciding on the size and layout! A good starting point for a spacious lofted shed is 10ft x 12ft or larger. This provides ample space downstairs for storage and a comfortable loft area upstairs. Think about what you'll be storing and using the space for. Will you need workbench space? Shelving? Consider adding windows for natural light and ventilation. A door on the side, in addition to the main entrance, can also be really useful.
Materials List
Next, gather your materials. Creating a detailed list beforehand will save you time and frustration later. Here’s a general list; you’ll need to adjust quantities based on your shed’s dimensions:
- Pressure-treated lumber for the foundation and framing
- Plywood for the walls and roof
- Roofing materials (shingles, metal, etc.)
- Doors and windows
- Hardware (nails, screws, hinges, etc.)
- Concrete for the foundation (if needed)
- Loft flooring materials
- Insulation (optional but recommended)
Building Your Lofted Shed: A Step-by-Step Guide
With your plans finalized and materials gathered, let's get building!
Foundation
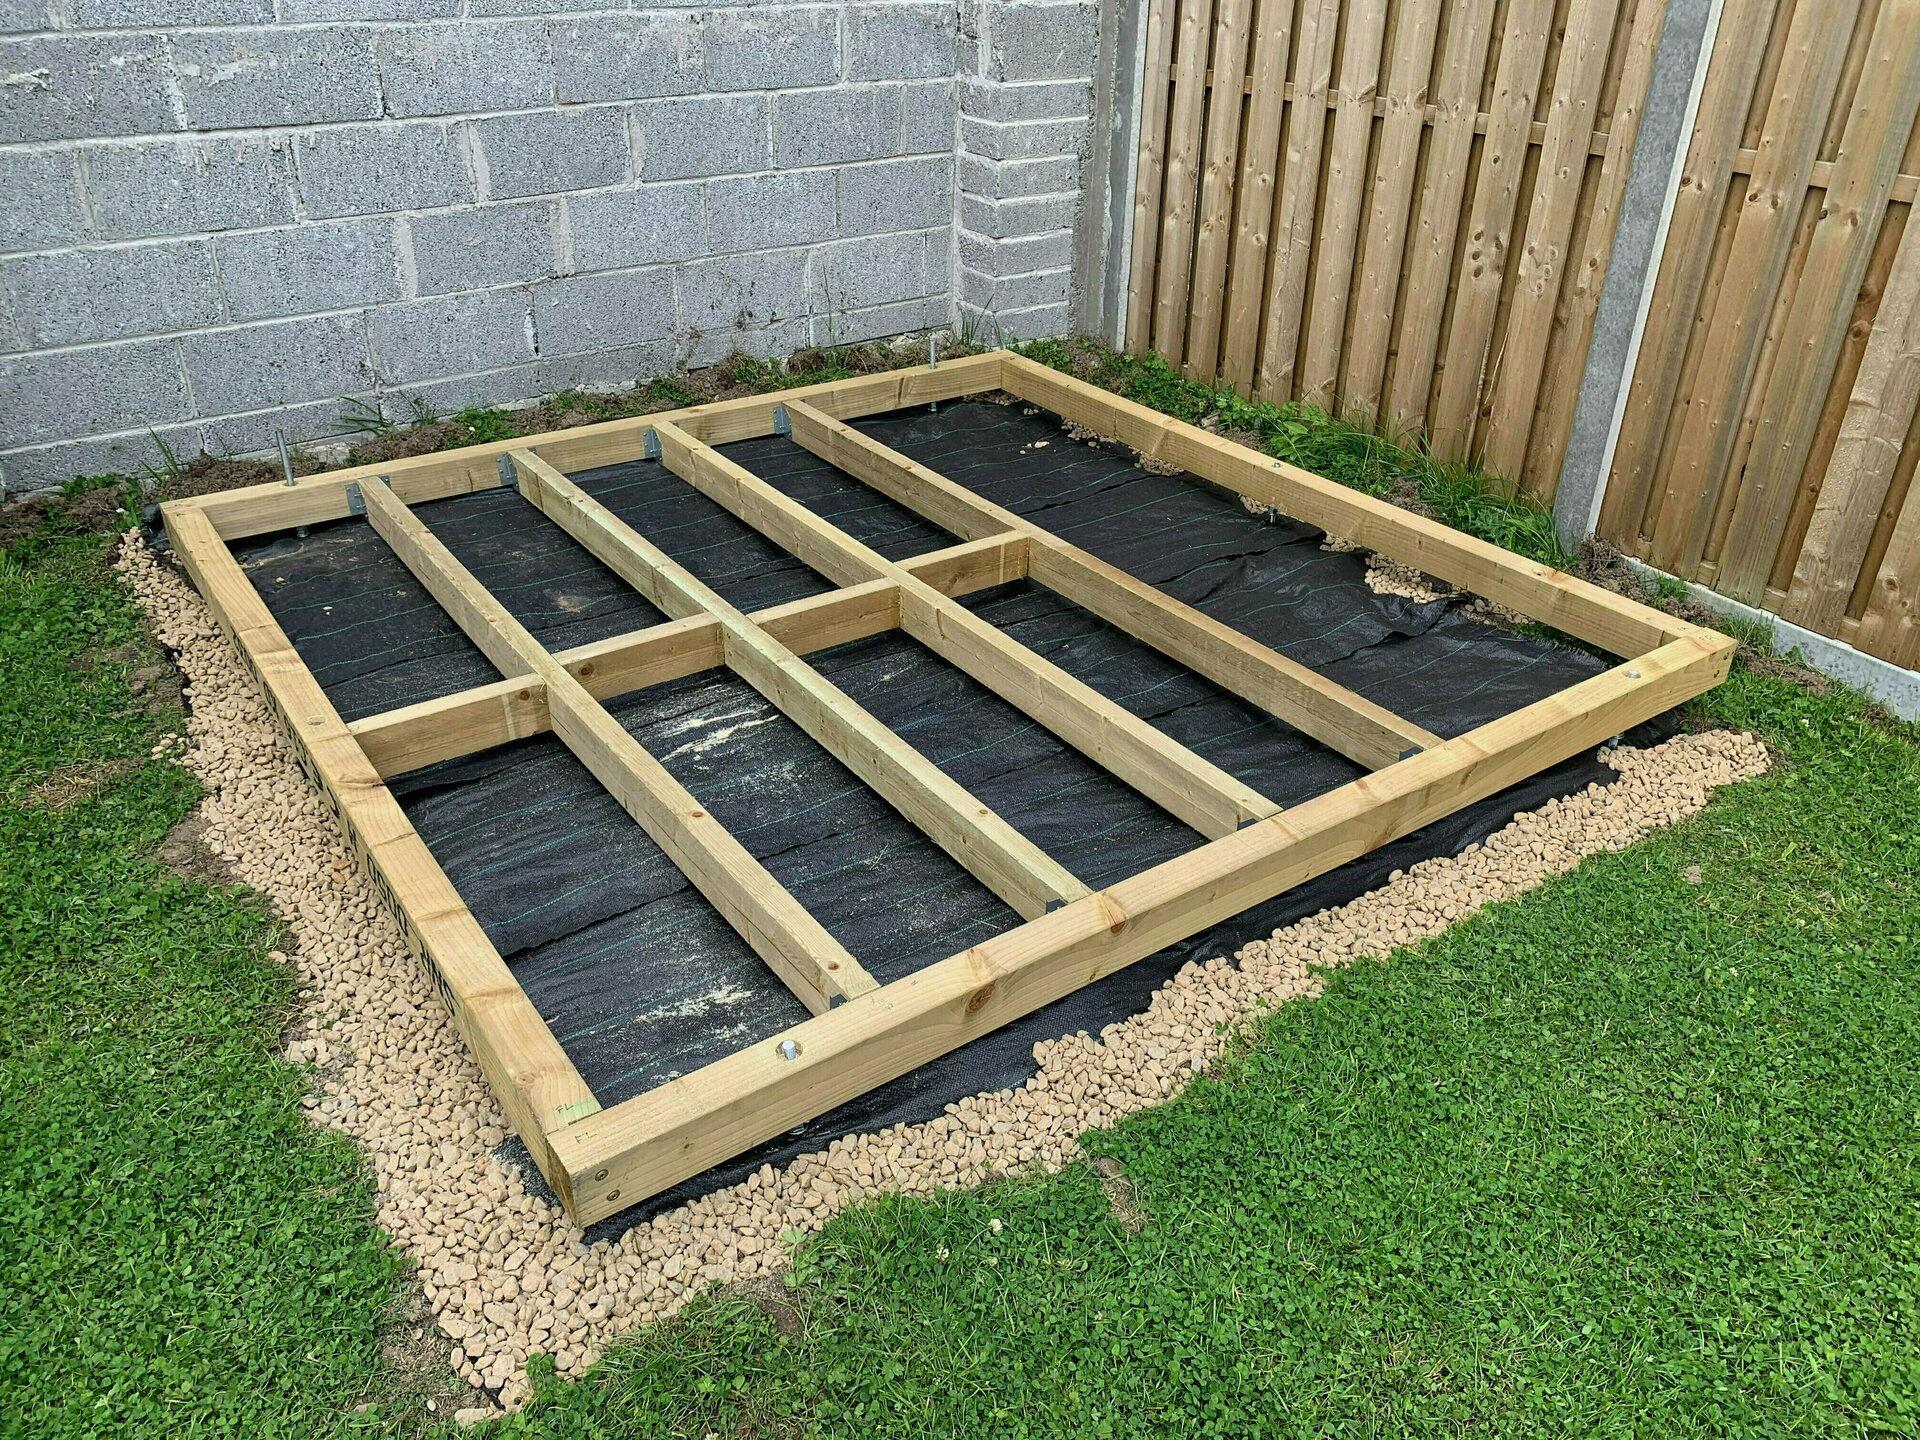
First, prepare a level foundation. For smaller sheds, you might get away with a gravel base. However, for a larger, lofted structure, a concrete slab is strongly recommended for stability and longevity. This provides a solid base to build upon, preventing settling and potential damage to your shed over time. Make sure your foundation is perfectly level.
Framing
Next, erect the frame of your shed. Use pressure-treated lumber for the floor joists, wall studs, and roof rafters. Ensure all the framing is square and plumb. Remember to consider the placement of your doors and windows during this stage. Accurate measurements are crucial here.
Sheathing and Roofing
Once the frame is up, attach plywood sheathing to the walls and roof. This provides a solid surface for the exterior cladding and roofing materials. Make sure all sheathing is securely fastened. Then, install your chosen roofing material, ensuring it's properly waterproofed.
Adding the Loft
Now for the fun part â€" building the loft! Start by installing the loft floor joists, ensuring they're securely supported by the main structure. Then, add your chosen flooring material. Consider adding a railing for safety.
Finishing Touches
Finally, add the finishing touches: doors, windows, and any interior features like shelving or workbenches. Consider painting or staining the exterior for protection and aesthetics. You might also want to add insulation to keep the shed comfortable year-round. Insulating the walls and ceiling will help regulate the temperature and make the space more usable.
Tips for Success
Building a lofted shed is a rewarding project, but here are some tips to ensure a smooth process:
- Take your time: Don't rush the process. Accuracy is more important than speed.
- Check your measurements frequently: Double-check measurements at every stage to avoid costly mistakes.
- Use the right tools: Invest in or borrow quality tools for a better outcome.
- Ask for help when needed: Don't hesitate to ask friends or family for assistance with heavier tasks.
- Safety first: Always wear appropriate safety gear, including safety glasses and gloves.
Commonly Asked Questions
Here are some answers to common questions about building a lofted shed:
- Do I need a building permit? This depends on your local regulations. Check with your local council or homeowner's association before starting construction.
- How much does it cost to build a lofted shed? The cost will vary depending on the size, materials, and your labor costs. Expect to spend several hundred to several thousand dollars depending on your needs and choices.
- Can I build a lofted shed myself? Yes! With careful planning and execution, you can build a lofted shed yourself. However, if you're not comfortable with certain aspects of construction, consider hiring a professional for specific tasks.
- What kind of wood should I use? Pressure-treated lumber is recommended for its durability and resistance to rot and insects. Avoid using untreated lumber for the foundation and framing.
- How do I ensure the loft is safe? Use sturdy materials for the floor joists and install a strong railing to prevent falls. Consider adding extra support if needed.
And there you have it! Building your own spacious lofted shed is a fantastic project that will provide you with years of enjoyment. Remember to plan meticulously, work safely, and take your time â€" the reward of a beautiful and functional shed will be well worth the effort! Happy building!
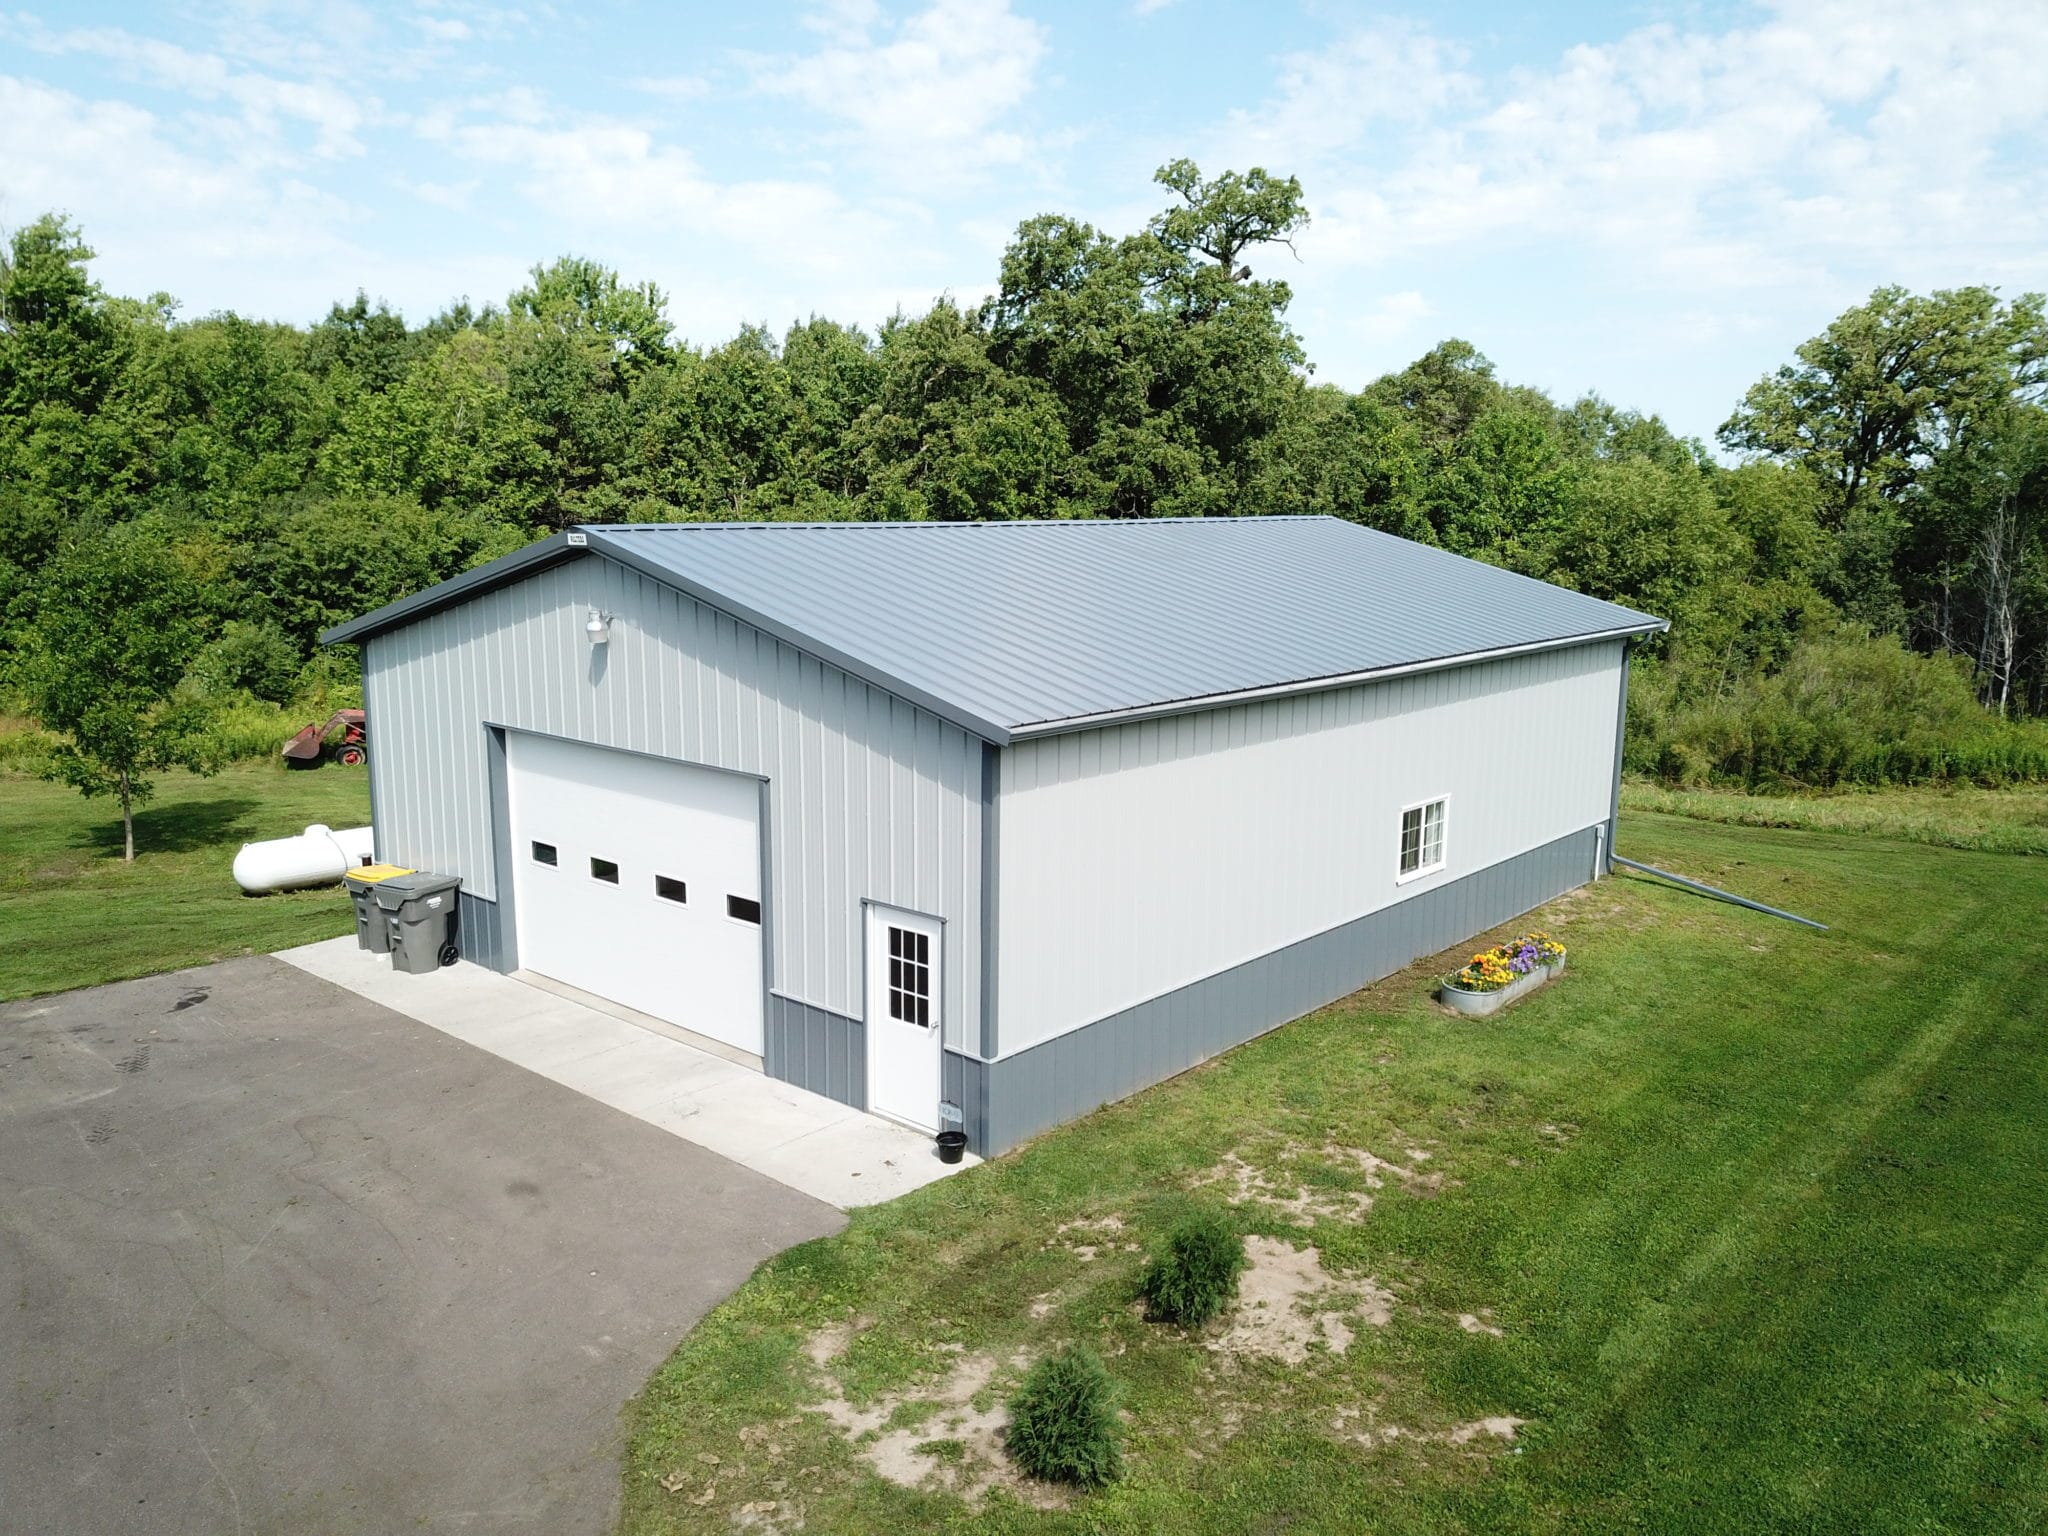
How to Build a Pole Barn with a Secure Foundation for Heavy Equipment

Alright, so you're thinking about building a pole barn. Maybe you're a farmer, a mechanic, or just someone who wants a big, open space for your projects. Whatever your reason, a pole barn is a great choice. They're sturdy, affordable, and you can build them pretty fast. But here's the thing - you need a strong foundation, especially if you're planning to store heavy equipment. Don't worry, we're gonna break it down step-by-step, making this project feel less like a construction nightmare and more like a satisfying DIY victory.
First Things First: The Foundation
The foundation is the heart of your pole barn, and it's where you need to put the most thought and effort. You want something that's going to handle the weight of your equipment, withstand the elements, and last for years to come. There are a few options, and the best one depends on your soil type, budget, and the weight you're expecting.
Concrete Piers: These are super sturdy and popular for pole barns. They're basically concrete cylinders that are poured into holes dug into the ground. The pier supports the pole, and you can adjust the height to accommodate different terrain. They work great for heavy equipment, as they provide excellent support and resistance to frost heave (that pesky freezing and thawing of the ground).
Concrete Footings: These are a bit more complex, involving a larger concrete pad that extends below the frost line. They provide a wider base, making them especially strong for heavier loads. This is a good option if you have a lot of equipment or if you're worried about settling over time.
Pressure-Treated Posts: If you're on a tight budget and have good soil conditions, you can use pressure-treated posts as your foundation. These posts are treated with chemicals that resist rot and decay, making them durable and long-lasting. They're typically cheaper than concrete, but you need to make sure your soil is well-drained and can support the weight of your equipment.
Choosing the Right Foundation:
To make the right decision, consider your soil type. If you have clay or expansive soil (soil that expands and contracts a lot), you'll need a deeper foundation to avoid frost heave. If you have sandy or well-drained soil, you might be able to get away with a shallower foundation. Also, think about the weight of your equipment. The heavier it is, the stronger your foundation needs to be.
Preparing the Site:
Once you've chosen your foundation, it's time to get your site ready. This involves clearing the area, grading it, and making sure it's level. You'll also need to consider any utilities (electricity, water, etc.) that you'll need to run to your barn.
Clear the Area: Remove any trees, bushes, or other vegetation that might interfere with your construction. Use a tractor or excavator if necessary.
Grade the Area: This means smoothing out the ground and making sure it's level. You can use a laser level or a traditional level for this.
Mark the Post Locations: Once the site is prepped, use stakes and string to mark the exact locations of your poles. This will ensure that your barn is square and the poles are evenly spaced.
Building the Foundation:
Now comes the part where you get your hands dirty. The building process will vary depending on the type of foundation you choose.
Concrete Piers:
Dig the Holes: Use a post-hole digger or a powered auger to dig the holes for the piers. The depth of the holes depends on the frost line in your area. Make sure the holes are the right diameter to accommodate the piers.
Pour the Concrete: Mix the concrete according to the manufacturer's instructions. Then, carefully pour it into the holes. Use a level to ensure that the piers are straight and even.
Add Rebar: You can reinforce the concrete piers by adding rebar to the bottom of the hole before pouring the concrete. This will help the piers withstand heavier loads and resist cracking.
Curing the Concrete: After pouring the concrete, allow it to cure for at least 24 hours. This will give it time to harden and reach its full strength.
Concrete Footings:
Dig the Trenches: Use a backhoe or a manual excavator to dig trenches for the footings. The trenches should be wide and deep enough to accommodate the concrete pads.
Pour the Concrete: Mix the concrete and carefully pour it into the trenches. Use a level to ensure that the footings are level and flat.
Reinforce the Footings: Add rebar to the footings to increase their strength and prevent cracking.
Curing the Concrete: Allow the concrete to cure for at least 24 hours before moving on to the next step.
Pressure-Treated Posts:
Dig the Holes: Use a post-hole digger to dig the holes for the posts. Make sure the holes are deep enough to reach below the frost line.
Set the Posts: Carefully lower the posts into the holes, ensuring they are plumb and straight. Use shims to adjust their position as needed.
Backfill the Holes: Fill the holes with gravel or compacted soil around the posts. This will provide drainage and support.
Erecting the Poles:
Now you're ready to start putting up the poles! This is where you'll really start seeing your barn take shape.
Position the Poles: Using a level, carefully position the poles on the foundation. Make sure the poles are plumb and straight.
Secure the Poles: Depending on your foundation, you can attach the poles to the concrete with specialized anchors or bolts. For pressure-treated posts, you can use concrete or gravel to stabilize them.
Bracing the Poles: Once the poles are in place, you'll need to add bracing to prevent them from moving or swaying. You can use steel or wood braces for this.
Building the Frame:
Now for the fun part - the framing!
Add the Trusses: The trusses are the triangular supports that will hold up your roof. They are usually prefabricated and come in sections that you can easily attach to the poles.
Sheathing the Roof: Once the trusses are in place, you'll need to add sheathing to create a solid base for your roof covering. This can be made of plywood or OSB (oriented strand board).
Install the Roof Covering: You can use a variety of roofing materials, such as metal roofing, asphalt shingles, or even wood shakes.
Building the Walls:
With the roof in place, you can start framing your walls.
Frame the Walls: This is a fairly straightforward process. You'll be nailing together studs to form the walls of your barn.
Add Siding: Choose your siding material, whether it's metal, wood, or vinyl. Install it according to the manufacturer's instructions.
Insulate the Walls: If you want your barn to be warm in the winter and cool in the summer, you'll need to insulate the walls. You can use fiberglass insulation or foam boards.
Finishing Touches:
With the structure up, you can personalize your pole barn!
Add Doors and Windows: Choose the doors and windows that best suit your needs and style.
Install a Floor: You can use concrete, gravel, or even a wood floor.
Paint or Stain: Give your pole barn a fresh coat of paint or stain to protect it from the elements and enhance its appearance.
Safety First:
Working with heavy equipment and construction tools can be dangerous. It's important to take all the necessary precautions to ensure safety.
Wear Protective Gear: Always wear safety glasses, gloves, and sturdy boots when working on your pole barn.
Use Proper Tools: Use tools that are in good working condition and know how to use them safely.
Be Aware of Your Surroundings: Pay attention to your surroundings and be aware of potential hazards.
Finishing Up:
Congratulations! You've built your very own pole barn. Enjoy the space, keep it organized, and let your creativity flow. You now have a sturdy, reliable, and versatile structure that can be used for anything from storing equipment to hosting parties! Remember to maintain your barn regularly to keep it in top shape.
And if you ever find yourself needing a little extra help, don't hesitate to reach out to a professional contractor. They can offer expert advice and guidance, ensuring that your pole barn project is a success. Good luck!
How to Build a Pole Barn with a Loft for Extra Space

Alright, folks, let's talk pole barns. You know, those sturdy, versatile structures that can be anything from a simple workshop to a weekend getaway cabin. And guess what? We're going to take it up a notch today by adding a loft! More space? Sign me up!
Building your own pole barn with a loft isn't just about having a place to store your lawnmower or park your car. It's about expanding your horizons, creating something unique, and adding value to your property. So grab a cup of coffee, put on your thinking cap, and let's dive into the exciting world of DIY pole barn construction.
Step 1: The Blueprint - Your Vision Takes Shape
First things first, you need a plan. What are you using this pole barn for? Is it going to be a workshop, a garage, a studio, or maybe even a guest house? Knowing what you're building for will dictate the size, layout, and features of your pole barn.
Size Matters: Think about your needs. How much stuff are you storing? What vehicles are you parking? Do you need room for a workbench or equipment?
Layout & Features: Consider how you want to use the space. Do you need separate areas for work and storage? Would a bathroom or kitchenette be useful? Do you want windows for natural light?
Loft Access: Decide how you want to get to your loft. A traditional staircase, a ladder, or even a pull-down ladder are all options.
Once you've got a clear vision, sketch out a basic floor plan. This doesn't need to be perfect, just a way to visualize the layout and size of your pole barn. You can also use online tools or work with a professional to create detailed plans.
Step 2: The Foundation - A Solid Base
Now, let's talk about the foundation. Pole barns are known for their simple construction, often utilizing concrete piers or a slab foundation.
Concrete Piers: These are strong, cost-effective, and a good choice for less-demanding projects. They basically involve digging holes, placing concrete, and then setting the poles on top.
Slab Foundation: For heavier loads or if you're planning a more complex structure, a slab foundation is recommended. This involves pouring a thick layer of concrete to create a solid base for your pole barn.
Remember, local building codes might require specific foundation requirements, so be sure to check with your municipality before you start digging.
Step 3: The Poles - The Backbone of Your Barn
The "pole" part of the pole barn comes into play now. You'll need to choose the right poles to support the structure.
Materials: The most common pole materials are wood and steel. Wood poles are typically more affordable, while steel poles offer greater durability and resistance to pests.
Size and Spacing: The size of your poles and their spacing will depend on the size and weight of your pole barn. Consult with a structural engineer or use a pole barn construction guide to determine the appropriate size and spacing for your project.
Once you have your poles, they'll be set into the foundation and secured to the ground. This is where you'll need some heavy lifting equipment, like a crane or a forklift. It's best to have some help for this step!
Step 4: Framing and Roofing - Putting it all Together
With the poles in place, it's time to start building the frame and roof.
Framing: The frame is typically constructed from wood or steel and will support the walls, roof, and loft floor. This is where you'll need to be comfortable working with lumber and building components.
Roofing: Your choice of roofing material will depend on your budget and the desired look of your pole barn. Metal roofing is popular for its durability and low maintenance, while asphalt shingles offer a more traditional aesthetic.
As you build the frame, you'll also be creating openings for doors, windows, and access to the loft. Remember to factor in the size and placement of these elements as you're working.
Step 5: The Loft - Adding Extra Living Space
Now comes the exciting part - the loft! Building a loft adds an extra layer of complexity, but the reward is a spacious and versatile area.
Loft Floor: The loft floor will be supported by beams that rest on the main frame of your pole barn. You'll need to carefully plan the size and placement of these beams to ensure a strong and stable loft.
Loft Access: As mentioned earlier, choose the best method for accessing your loft. A traditional staircase is the most comfortable option but takes up space. A ladder is more compact but can be less convenient. A pull-down ladder is a space-saving option but can be a bit more challenging to use.
Finishing the Loft: Once the loft floor is in place, you can start finishing it. You'll need to install walls, windows, flooring, and any other desired features. Consider insulation to improve energy efficiency and make the loft more comfortable year-round.
Step 6: Finishing Touches - Bringing Your Vision to Life
With the main structure complete, it's time to put the finishing touches on your pole barn.
Siding: Choose a siding material that suits your style and budget. Metal siding is durable and low-maintenance, while wood siding offers a more traditional look.
Windows: Windows provide natural light and ventilation. Consider the size and placement of your windows to optimize the amount of sunlight entering your pole barn.
Doors: You'll need at least one door to access your pole barn. Consider using garage doors for larger openings or double doors for easier access.
Interior Finishes: Complete the interior of your pole barn with flooring, walls, and any desired fixtures. You might want to add insulation, lighting, and electrical outlets.
Step 7: Safety First!
Building a pole barn is a rewarding project, but it's important to prioritize safety.
Wear Protective Gear: Always wear safety glasses, gloves, and sturdy shoes when working on your pole barn.
Use Proper Tools: Choose tools that are appropriate for the task at hand and make sure they are in good working order.
Follow Instructions: Always follow the manufacturer's instructions for any tools, materials, or equipment you use.
Get Help When Needed: Don't be afraid to ask for help when lifting heavy objects or performing tasks that require multiple people.
And There You Have It!
Building your own pole barn with a loft is a challenging but fulfilling project. With careful planning, a little elbow grease, and a dash of creativity, you can create a space that meets your specific needs and adds value to your property. Remember, there are resources available to help you along the way. Consult with a professional, utilize online guides, and don't be afraid to ask questions.
So, are you ready to build your own pole barn paradise? Get those blueprints ready, gather your tools, and let's get building!
How to Build a Pole Barn with a Concrete Floor
Hey there, fellow DIYer! You've got that dream in your head - a spacious, versatile pole barn. A place for everything from your prized vehicles to your workshop, or maybe even a cozy living space. And you've decided to go for it, with a concrete floor to top it all off. Awesome! This is going to be a fun journey, and I'm here to walk you through it, step by step.
Step 1: Getting Your Foundation Right
Before we even start thinking about concrete, we need a solid base. Think of your pole barn as a house - without a good foundation, things will start to wobble and crack. Now, you've chosen a pole barn, which means the foundation is going to be made of sturdy, deep-set poles. This is different from a traditional house foundation, but still requires careful planning.
Choose the right poles: You've got options here - steel is durable and long-lasting, but wood is a classic choice. Make sure the poles you choose are pressure-treated to resist rot and insects.
Dig those holes: You'll need to dig holes for your poles deep enough to reach frost-free soil. This varies based on your location, so check with your local building department.
Set the poles: Once the holes are dug, you'll need to install the poles, ensuring they're level and plumb. For extra stability, you can add concrete to the holes around the poles.
Step 2: Planning Your Concrete Floor
Now we're getting to the good stuff! A concrete floor is a blank canvas, perfect for whatever your barn needs. But before we mix the concrete, we need to plan it out.
Measure twice, cut once: Accurate measurements are key to a smooth, level floor. Use a tape measure and chalk line to mark out the area where the concrete will be poured.
Think about your needs: Will you be using heavy machinery in your barn? Do you need a smooth, level surface for vehicles? This will help you choose the right thickness and type of concrete.
Consider drainage: A slightly sloped concrete floor will help with drainage, preventing water from pooling and causing problems. You can create this slope using a level and some sand.
Step 3: Preparing the Soil and Sub-base
The concrete floor needs a stable, well-compacted base to rest upon. Here's where you'll be doing some hard work!
Clear the area: Remove any debris, rocks, or vegetation from the area where the concrete will be poured. This is easier than trying to do it after the concrete is set.
Compact the soil: Use a compactor or tamper to compact the soil, ensuring a firm base. This will prevent settling and cracking of the concrete.
Install a sub-base: For extra strength and insulation, you can add a layer of gravel or crushed stone as a sub-base. This also helps with drainage and prevents the concrete from freezing in cold weather.
Step 4: Building Forms
Now it's time to create the shape of your concrete floor. This is where the forms come in.
Choose your materials: Forms can be made from wood, steel, or even plastic. Wood is a popular and affordable choice, but make sure you use pressure-treated lumber to prevent rotting.
Build the forms: The forms need to be sturdy and able to withstand the pressure of the wet concrete. Use stakes and bracing to keep the forms in place.
Check for level: Use a level to ensure the forms are perfectly level. This is crucial for a flat, even concrete floor.
Step 5: Mixing and Pouring the Concrete
Now for the exciting part! Mixing and pouring the concrete can be a big job, but it's also satisfying to see your floor take shape.
Choose the right mix: You'll need to decide between pre-mixed concrete or a mix you make yourself. Consider the strength and workability required for your project.
Prepare the mix: If you're mixing your own concrete, make sure you follow the instructions carefully. The right mix is essential for a strong, durable floor.
Pour the concrete: Start pouring the concrete from one end of the forms, working your way across. Use a shovel to spread the concrete evenly and tamp it down to remove air pockets.
Step 6: Finishing the Concrete Floor
The final step is to give your concrete floor a smooth, polished look.
Level and smooth: Use a trowel to level and smooth the surface of the concrete, creating a uniform finish.
Add texture (optional): You can add texture to the concrete using a broom, float, or other tools. This can create slip resistance and a decorative look.
Curing the concrete: After pouring, the concrete needs time to cure properly. Cover the floor with plastic sheeting to prevent it from drying out too quickly.
Step 7: Adding Finishing Touches
Once the concrete has cured, you can add finishing touches to personalize your pole barn floor.
Paint or stain: Add color to your floor using paint or stain. This can help to protect the concrete and create a more polished look.
Add insulation: Adding insulation beneath the concrete can help to create a warmer and more comfortable space.
Seal the floor: Sealing the concrete will protect it from stains, spills, and wear and tear. Choose a sealer that's suitable for your needs.
Congratulations! You've just built a beautiful, functional pole barn with a durable concrete floor. Now you can enjoy your new space for years to come!
Remember: Building a pole barn with a concrete floor is a big project, so it's important to plan carefully and take your time. Don't be afraid to ask for help from experienced professionals if you need it. And most importantly, have fun with the process! Building your own pole barn is a rewarding experience that you'll cherish for years to come.
How to Build a Pole Barn with a Custom Floor Plan

Pole barns, with their sturdy construction and versatility, have become increasingly popular for a wide array of purposes, from workshops and garages to stables and recreational spaces. Their adaptability allows for customization, making them an ideal choice for those seeking a structure that perfectly meets their specific needs. This guide provides a detailed overview of the process involved in building a pole barn with a custom floor plan, covering everything from design considerations to construction techniques.
I. Planning and Design: Laying the Foundation for Your Vision
The initial stage involves careful planning and design, ensuring your pole barn aligns with your specific requirements. This involves:
a) Defining Purpose and Functionality: Clearly define the intended use of the pole barn. Will it serve as a workshop, garage, storage space, or a combination of these? Understanding the primary function will guide subsequent design decisions.
b) Determining Dimensions and Footprint: Calculate the required square footage based on the intended purpose and equipment or vehicles you wish to accommodate. Consider factors like headroom, aisle widths, and potential future expansions.
c) Customizing the Floor Plan: This is where you bring your vision to life. Sketch a preliminary floor plan, outlining the layout of interior spaces, doors, windows, and other features. This may involve creating dedicated zones for specific activities, such as a workbench area in a workshop or a separate section for storage.
d) Incorporating Structural Considerations: Pole barns are known for their durability, but it is crucial to ensure the structural integrity of the building. Factors like roof pitch, snow load, and wind pressure should be considered during design. Seek guidance from a qualified engineer for structural calculations, especially in areas prone to extreme weather conditions.
e) Choosing Materials: Select building materials that align with your budget and desired aesthetic. Common choices include:
Posts: Pressure-treated lumber or steel posts provide long-lasting strength.
Framing: Lumber, steel beams, or a combination of both can be used for framing.
Roofing: Metal roofing offers durability and low maintenance, while asphalt shingles provide a more traditional look.
Siding: Various siding options are available, ranging from wood to vinyl to metal, offering diverse aesthetic and cost considerations.
II. Foundation: The Stable Ground for Your Structure
A strong foundation is critical for any pole barn, providing stability and ensuring longevity. Common foundation types include:
a) Concrete Piers: These are cost-effective and suitable for various soil conditions. Concrete piers are poured into pre-drilled holes, offering a solid base for the posts.
b) Concrete Slab: A continuous concrete slab provides a level and stable surface for the entire structure. This option is beneficial for areas with fluctuating soil conditions.
c) Crawl Space: This foundation type allows for ventilation and access for plumbing or wiring. A crawl space can be advantageous for areas with drainage concerns.
d) Basement: A basement offers additional living or storage space but requires more extensive construction and excavation. It may be a suitable option for pole barns with specific functional needs.
The choice of foundation type depends on factors such as soil type, local building codes, and the overall budget. Consult with a foundation specialist or contractor to determine the best option for your specific project.
III. Pole Construction: The Backbone of Your Barn
This stage involves installing the posts, which form the structural backbone of the pole barn.
a) Site Preparation: The construction site needs to be cleared and leveled according to the foundation plan. Excavation for piers or slab may be required, depending on the chosen foundation type.
b) Post Installation: The pre-cut posts are then placed on the foundation, ensuring they are plumb and level. Depending on the foundation, posts may be anchored using bolts or concrete.
c) Girder Installation: Once the posts are securely in place, girders are installed horizontally, spanning the distance between the posts. Girders provide support for the roof and walls.
d) Wall Framing: Wall framing is added to the posts and girders, creating the exterior walls of the structure. Wall framing may include studs, sheathing, and insulation for added stability and weather resistance.
IV. Roof Construction: Shedding Light on Your Design
The roof construction phase involves installing the roof framing and covering, creating a weather-tight shelter.
a) Rafter Installation: Rafters are installed to span the distance between the girders, creating the supporting structure for the roof sheathing.
b) Roof Sheathing: Sheathing is attached to the rafters, providing a solid base for the roofing material.
c) Roofing Installation: The chosen roofing material is then installed, adhering to manufacturer guidelines and local building codes. Options include metal roofing, asphalt shingles, or specialized roofing systems.
d) Eaves and Fascia: Eaves and fascia are installed to finish the roofline, offering a decorative element and concealing the roof framing.
V. Exterior Cladding: Creating the Outer Shell
The exterior cladding adds protection and visual appeal to the pole barn.
a) Siding Installation: The chosen siding material is installed over the wall framing, creating the exterior shell of the structure. Siding options include wood, vinyl, metal, or a combination of materials.
b) Windows and Doors: Windows and doors are installed according to the floor plan, providing natural light and access to the interior.
c) Trim and Molding: Trim and molding are added to enhance the aesthetics of the exterior, creating visual appeal and defining the structure's lines.
VI. Interior Finishing: Bringing Your Vision to Life
The final stage focuses on completing the interior, creating a functional and visually appealing space.
a) Flooring: Select the appropriate flooring for the intended use of the pole barn. Options include concrete, wood, epoxy coatings, or specialized flooring materials.
b) Walls and Ceilings: Walls and ceilings can be finished with various materials, such as drywall, plywood, or paneling. Insulation can be installed to enhance energy efficiency and comfort.
c) Electrical and Plumbing: Install electrical wiring and plumbing as per local codes and your specific needs.
d) Interior Features: Add finishing touches like shelving, cabinets, workbenches, or other interior features to personalize the space and enhance functionality.
VII. Considerations for a Custom Floor Plan:
A custom floor plan provides unparalleled flexibility, allowing you to design a pole barn that perfectly meets your specific needs. Here are key considerations:
a) Layout Functionality: Plan the layout to maximize space and efficiency. Designate specific areas for activities, storage, or equipment.
b) Door and Window Placement: Strategically place doors and windows to optimize natural light, ventilation, and access.
c) Future Expansion: Consider future needs and potential expansion possibilities when designing the floor plan.
d) Budget and Materials: Balance your desired features with your budget constraints, choosing materials that are cost-effective and durable.
VIII. Conclusion: Building Your Dream Pole Barn
Building a pole barn with a custom floor plan requires careful planning, skilled execution, and a commitment to detail. By following the steps outlined in this guide, you can create a durable, versatile, and visually appealing structure that fulfills your specific needs and reflects your personal style. Remember to consult with professionals like engineers, contractors, and building inspectors throughout the process to ensure a successful and safe outcome.
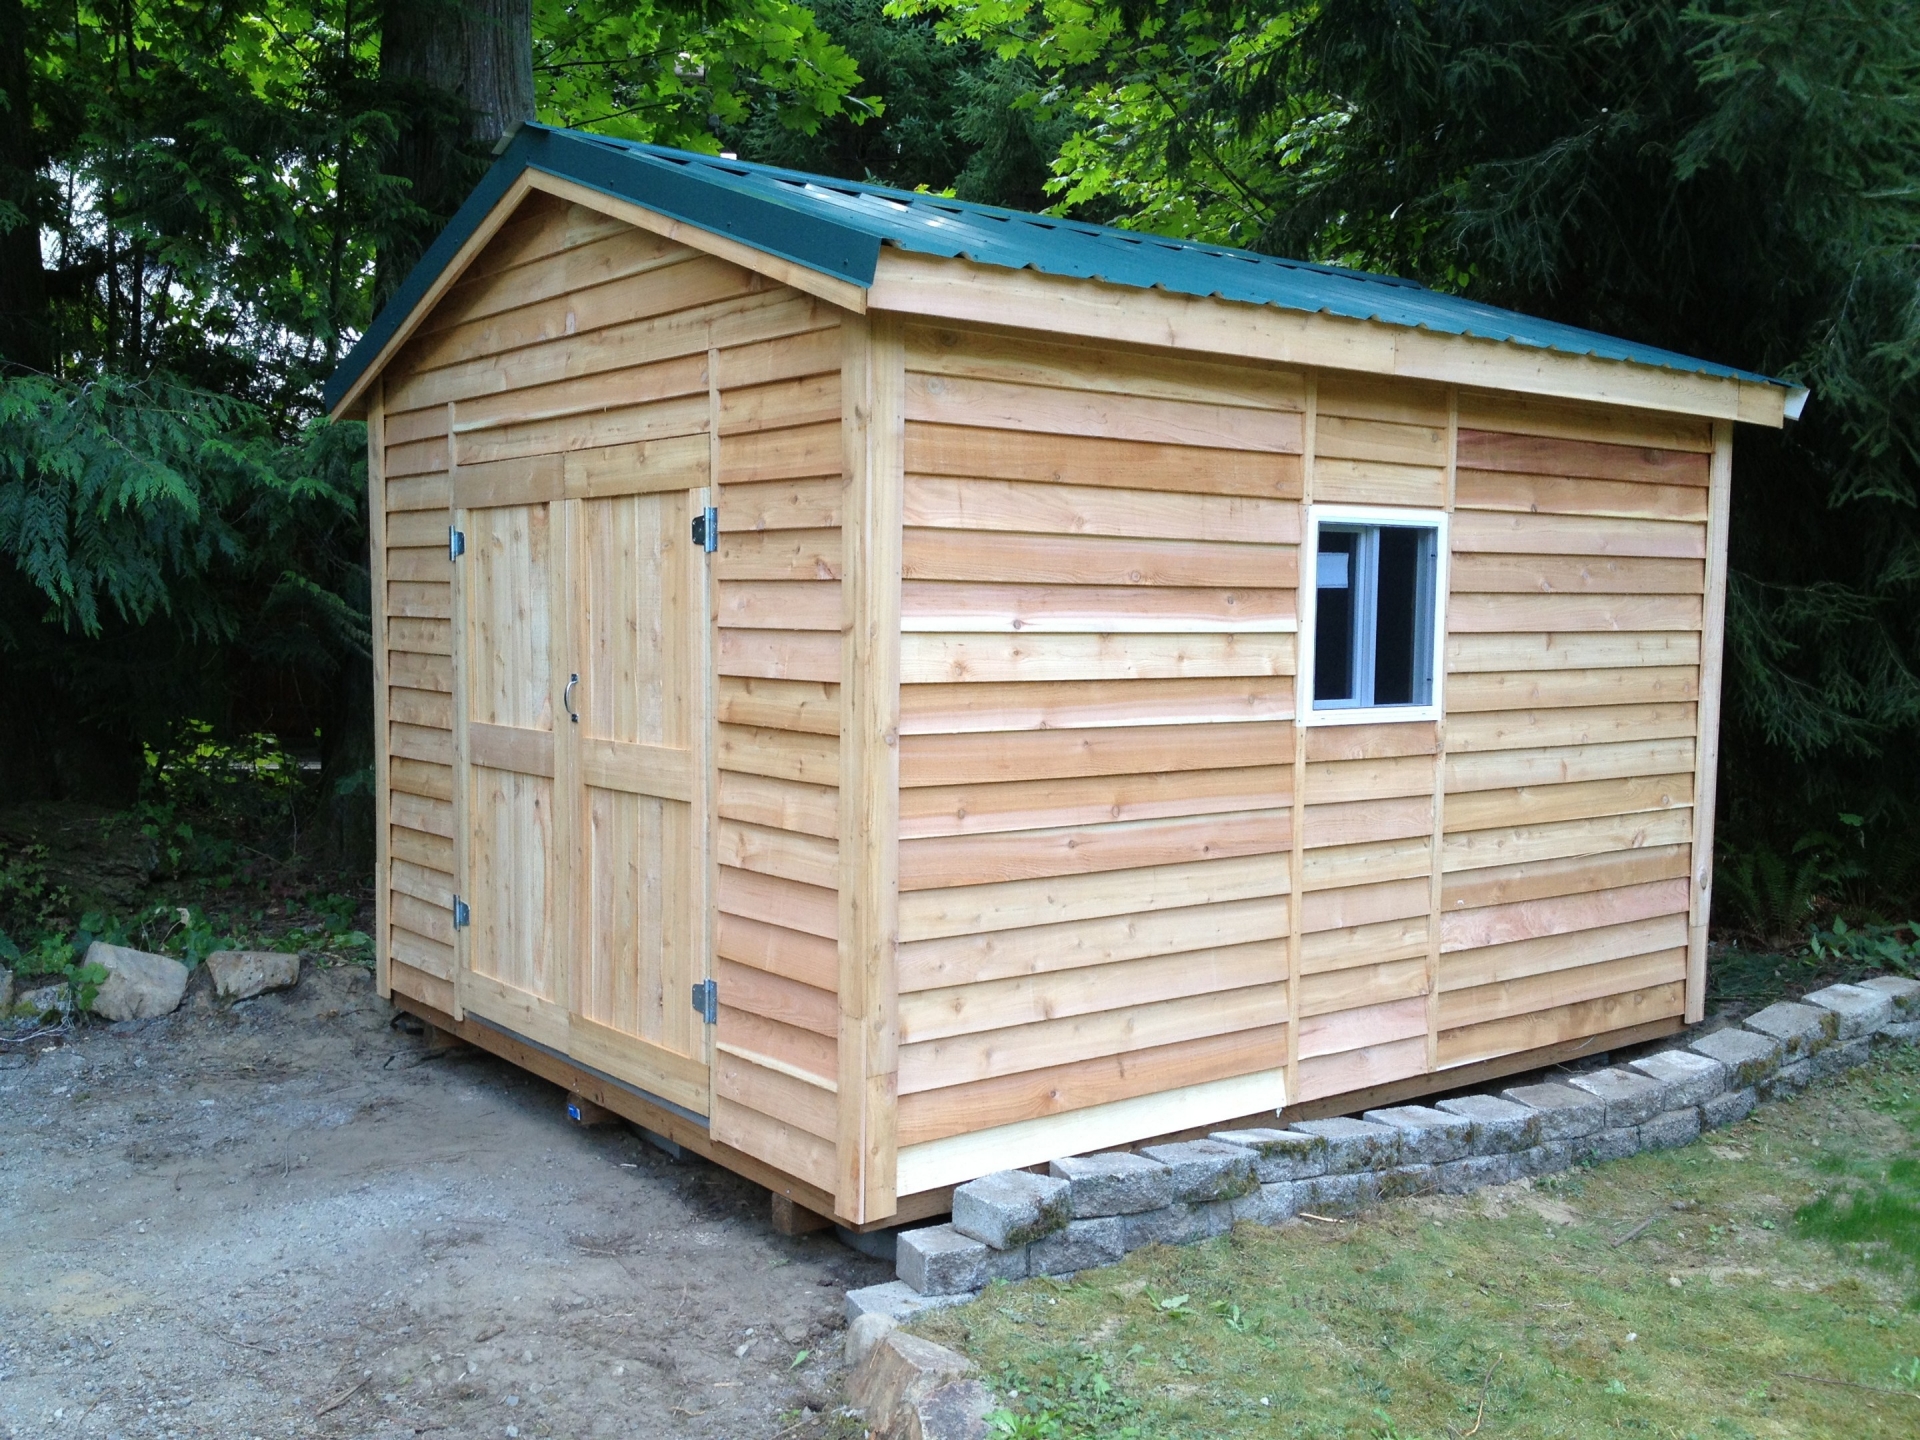
Building a garden shed with diy plans for beginners
Hey there, fellow gardener! Ever dreamed of having your own little haven in the backyard, a place to store all your tools, seeds, and maybe even a cozy chair for enjoying a morning coffee? Well, guess what? You can totally build your own garden shed!
Don't be intimidated by the thought of construction â€" this is a project even a beginner can tackle. It's all about taking it one step at a time, enjoying the process, and feeling proud of your handiwork. Plus, you'll be saving a ton of money by doing it yourself.
Let's Break It Down
Building a shed is like baking a cake: you start with the basics and layer on the deliciousness.
1. Planning is Key:
Design Inspiration: First things first, browse some shed plans online or in books. Look at different styles, sizes, and features. Do you want a simple lean-to shed or something more elaborate? Think about what you'll store in it and how much space you need.
Measure Twice, Cut Once: Measure your yard carefully â€" you want to ensure your shed fits snugly, and it's not blocking any walkways or important features. Take note of any slopes or uneven ground you might have to account for.
Permit Check: Some areas require permits for shed construction. Contact your local building department to check the regulations. You don't want to get a nasty surprise later!
2. Gathering the Supplies:
Materials: Wood is the go-to for sheds, and you have plenty of choices: pressure-treated lumber for the foundation and bottom plates, good quality plywood for the walls and roof, and even cedar for a more natural look.
Tools: You'll need the basic construction toolbox: hammer, saw, measuring tape, drill, level, screwdriver, and a few extra tools specific to your project.
Fasteners: You'll need nails, screws, and even some construction adhesive to secure your project.
Roofing: Shingles, metal roofing, or even a simple tarp depending on your budget and style.
Doors and Windows: Pick the right size and style to match your shed. You can even find pre-made kits for added convenience.
3. Time to Build!
Foundation: This is your shed's base, so it's crucial to get it right. You can choose between concrete pads, wooden blocks, or even a gravel base.
Framing the Walls: Cut and assemble the wall studs according to your plans. Remember to leave openings for doors and windows.
Roof Framing: Similar to the walls, construct the roof framing with rafters, joists, and a ridge board. Make sure it's properly sloped to allow water to drain.
Sheathing and Siding: Attach plywood sheathing to the walls and roof for stability. You can then add siding to the exterior â€" think plywood, cedar, or even metal.
Installing Doors and Windows: Measure carefully and attach the doors and windows to the openings.
Roofing: Apply your chosen roofing material.
Finishing Touches: Paint or stain your shed for a personalized touch. Add trim and a decorative door handle.
Helpful Hints for the Beginner Builder:
Start Simple: Don't try to build a mansion of a shed on your first project. Keep it simple and manageable.
Practice Makes Perfect: Before you start on the actual shed, try building a small frame using scrap wood to get comfortable with the tools and techniques.
Ask for Help: Don't be afraid to ask for help from a friend or family member who has some construction experience.
Take Your Time: Building a shed is a process, not a race. Enjoy the journey!
Don't Be Afraid to Experiment: There's no "one right way" to build a shed. Feel free to experiment with different materials and designs to make your own unique creation.
The Joy of DIY
The greatest reward of building a garden shed yourself is not just the savings, but the satisfaction of creating something with your own hands. It's a project that will bring you joy every time you step into your little haven, knowing you built it with your own effort and love.
So, get ready to embrace the challenge, gather your tools, and get building! Who knows, maybe your first shed will inspire you to tackle even bigger DIY projects in the future. Happy building, and remember, it's all about the journey!
How to build a 10x12 garden shed using basic tools
Alright, so you want to build a 10x12 garden shed, huh? That's awesome! You're about to embark on a journey of DIY glory, and I'm here to guide you through it. Let's get this show on the road, but before we start throwing lumber around, let's get a few things straight.
First things first, safety:
Building anything requires a certain level of safety awareness. You'll be working with wood, power tools, and possibly heavy lifting. Here's the rundown:
Wear safety glasses: It's not cool to get wood chips in your eyes.
Use ear protection: Those power tools can be loud, and your ears will thank you later.
Wear sturdy work gloves: You don't want to get splinters or cuts from all that lumber handling.
Follow the instructions: This is crucial. Don't skip steps or try to be a hero. It's better to be safe than sorry.
Gathering your tools and supplies:
Let's talk about the essentials you'll need for your shed construction:
Measuring tape: This is your best friend. You'll be measuring everything, so make sure it's accurate.
Level: To make sure your shed is...well, level. Nobody wants a leaning shed.
Circular saw: This will be your primary tool for cutting lumber.
Hand saw: Handy for smaller cuts and trimming.
Hammer: For pounding nails and securing everything together.
Screwdriver: For those stubborn screws and finishing touches.
Power drill: To drill pilot holes before driving screws.
Safety glasses and ear protection: As mentioned before, safety first.
Lumber: This is the backbone of your shed. Decide what type of wood you want (pine, cedar, etc.). You'll need a lot of it, so be prepared!
Sheathing: This goes over the framing and adds structural strength to your shed. Plywood or OSB are good choices.
Roofing shingles: You need a roof to keep things dry, right? Choose your desired roofing material.
Windows and doors: Consider what size and style you want. A simple door and a couple of windows will do the trick.
Paint or stain: To give your shed a touch of personality and protect the wood.
Hardware: This includes nails, screws, hinges, handles, etc.
Let's build this shed!
Okay, now that you've got everything you need, let's dive into the construction process:
1. Laying the foundation: This is where you decide what type of foundation you want. A concrete slab is the most solid option, but you can also get away with a gravel bed and treated lumber. Make sure the foundation is level and large enough to accommodate your shed.
2. Building the floor: This involves constructing a frame using treated lumber. Remember, this will be supporting the weight of your shed, so use sturdy lumber. Cut the pieces according to your measurements and secure them using screws or nails.
3. Erecting the walls: This is where you'll build the walls using studs, top plates, and bottom plates. Make sure you use a level to ensure the walls are straight. Remember to consider the location of your doors and windows during this process.
4. Framing the roof: The roof framing is where you'll need to get a little creative. You'll be building a series of rafters to support the roof sheathing. There are different roof styles (pitched, flat, etc.), so choose what you think looks best and is appropriate for your climate.
5. Sheathing the roof and walls: This adds structural strength and provides a surface to apply the roofing material. Use plywood or OSB sheets for this.
6. Installing roofing: You'll need to waterproof your roof, so make sure you use the appropriate roofing material. This could be shingles, metal roofing, or even a membrane.
7. Adding doors and windows: Install your pre-selected doors and windows securely, making sure they fit properly and are easy to open and close.
8. Finishing touches: This includes painting or staining your shed, adding trim around the doors and windows, and installing any interior shelving or storage solutions.
Tips and Tricks:
Don't rush the process: It's better to take your time and do things right than to rush and end up with a shoddy shed.
Pre-drill holes for screws: This prevents splitting the wood.
Use a level frequently: This ensures that your shed is square and level.
Measure twice, cut once: A simple but effective rule to prevent mistakes.
Don't be afraid to ask for help: If you're unsure about something, ask a friend, family member, or even a local lumberyard employee.
Finally, enjoy your new shed!
Building a shed is a rewarding experience, and you'll have a sense of accomplishment when you're done. It's a great place to store your tools, garden supplies, or even just relax and enjoy your backyard. So get out there, gather your materials, and let's get building!
Remember, this is just a basic overview. There are many different ways to build a shed, and the best way is the one that works best for you. Feel free to personalize your shed by adding your own unique features and details. Happy building!
